Hi all! I've been so occupied by my orders that it takes me quite a while to actually post my projects on this blog. Today I'll be showing you how I did a cake inspired by Lindy Smith's Prettiest Posies ball cake. Lindy Smith is a renowned cake decorator from the UK and has written many cake decorating books. I really love her contemporary style and this cake is one of the few examples of her amazing vision.
First of all, I made a butter walnut cake using two halves of a 6 inch ball pan, covered it in buttercream and let it set in the fridge for it to be easier to cover in fondant later on.
For this cake, I did chrysanthemums and used two different ways of making them.First, a more contemporary peach coloured chrysanthemum and second, a more realistic looking version of the flower in yellow.Lindy Smith's version used silicone flower moulds, easier I guess but I wanted to decorate it without using the moulds :)
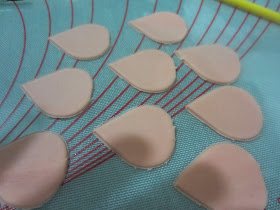
While waiting for the buttercream to set, I prepared and cut the petals for the classic chrysanthemum in peach coloured gumpaste.
I pinched the rounded part of the petal and glued it together with edible glue.
 Then I arranged it on a piece of fondant cutout from a round cutter like so. You can make two or three layers.
Then I topped it with a flower cut out from a plunger cutter.
The finished chrysanthemum looked like this in the end.

Next I used a tool called the dresden tool and curved the petals by pressing it from the outside to the middle of the flower.

I pressed a ball tool in the middle to give it a slight curve.
I did the same for all the petals and then arranged them and stuck them together with edible glue on a flower former and let it dry.
Next I made the roses. Instead of the usual classic rose technique, I used a simpler style called the ribbon rose. Basically I just cut out strips of rolled fondant and twisted it round to form a rose. Simple right? Yeah simple if you're only doing one or two flowers.Try 80 for the whole bunch? haha there you will probably faint because I nearly did. Finished the whole thing in two days.
Okay so once the buttercream on the cake was hardened in the fridge, I rolled out some white fondant and quickly covered the ball with it using the stretching and smooth technique.
Then I flipped it over, bunched it together carefully at the bottom and cut of the excess fondant. This is why it's important to have the buttercream really stiff. The ball of cake will be easier to handle and won't slip from your hands. Key words here are WORK FAST!
Here's how it looked like once smoothed over. A pretty adorable ball of cake if I might say.
Next I covered the cake board with fondant and imprinted a pattern unto it.
After that, I placed the ball on the board and started arranging the flowers unto the cake.
Then I attached a green fondant bow on top.
A lovely message was cut out using blue fondant.
Small flower accents to match was also attached.
Voila! The cake was done!
But wait minute... client wanted pink roses instead of white so I brushed on some pink edible dust unto the roses. I felt like the Queen of Hearts in the Alice in Wonderland story when I started doing this. I had to make it perfect else there would be an "OFF WITH HER HEAD!!" moment. LOL.
There you have it a Pretty Posies Ball Cake. Lovely ain't it?


No comments:
Post a Comment