Pages

The Making: Scuba Dude Cake and his Underwater friends

 Hi peeps!Today I'm gonna talk about the making of a scuba diving inspired cake. As you can see it has a scuba diver on top (I call him scuba dude) and some of his fishy friends below in the deep ocean. It was not a hard design to make but took equally as much time as my other more complicated designs prior to this. So let's get on to it!
Before starting anything, I covered the board with fondant made with a marbled effect.It's very easy just add a little white fondant to blue fondant and roll it out. It will the turn out looking like 'waves' in the sea.

As with all the designs that I do, I will prepare the coloured fondant first.This will save you time when you start decorating in the end.


I started by making the figurine first as this is always the first thing that needs to be done in order for it to set. I prepared the basic shapes like this pic and had it propped against the 'rock" so that it looked like he was resting on it while diving.


Next I finished up the tiny details such as the SCUBA tank, goggles. flippers and underwater watch. I left it to 'dry' for a day or two. Funny story with this scuba dude because he was meant for another cake but due to unforseen circumstances his cake was cancelled. He was finally adopted by another client and you know I could almost see him smile after that..:)
Next the yummy cake. This is a butter walnut cake. I baked two times enough for a two layer cake.
Next I covered and filled it with vanilla American buttercream.
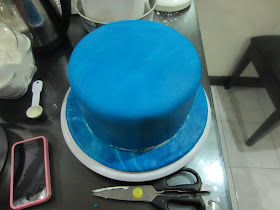
Then I covered it with ocean blue fondant.
To make the underwater seaweed, I just cut random shaped strips and lined the middle with a veining tool.
Then stuck those greenies on.
For the purple corals, I made little balls and indented it with a round edge tool.
To make the red corals, I just rolled out fondant  with two tapered ends and then stuck them first unto the cake.
Then I indented it again with a smaller round edge tool creating the coral effect.
Next up the yellow coral. I rolled the fondant somewhat like a cone. Then poked the larger end with a round end tool.
Next the pink flower anemone. I rolled fondant to look like bowling pins with various sizes.
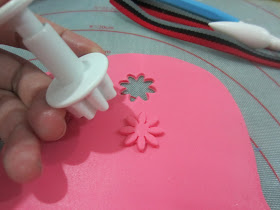
Then I made the petals with a small flower plunger cutter.
I then stuck the petals on to the smaller tip of those 'bowling pins' and added a white center.
Next up our friendly sea creatures. I cut out the shape of fish that I want and created the fins and tail using the veining method.
The dolphin was the same except I only added the white stripe on the bottom.
Then I arranged them all on the side of the cake. I added little details like the eyes, spots on the fish and bubbles.
Finally I put scuba dude to crown the cake with his hand as if trying to touch the dolphin.


A simple message done using patchwork alphabet cutters.
The happy scuba dude!

So there you have it..the making of a scuba diving themed cake. Hope you enjoyed reading about it :)) If you did, you can see and read about another scuba diver themed cake that I made right here, Thanks for reading! 


The Making : Classic vintage stencilled cake

Hello everybody!  I am on a roll this month as cake orders are steadily coming in. Despite my busy-ness, I managed to bake my own birthday cake. It's not as sad as it sounds but I really wouldn't have it any other way! In this post, I will be featuring a stencilled vintage looking cake.

First of all the cake itself. I baked one of my favourites. Red velvet with cream cheese frosting. You may get the recipe here.
I rolled and coloured some lime green fondant. I chose that colour because it's my favourite colour.
Next I made some royal icing in a spreadable consistency. I then took out my stencil which I had purchased all the way from the US and I laid it on top of the cake. Next I used a spatula to spread the royal icing on top of the stencil. I left the royal icing to dry for a while. After which I peeled the stencil off to reveal the pattern. If you would like to pre-order some stencils, please email me..:)
In the mean time, I made a simple ruffe-ly flower out of fondant. I just cut out some fondant mixed gumpaste with a rose cutter and folded each petals to create the ruffle. It's very easy especially when you want to put an elegant touch to a cake but is pressed for time. Earlier, I wanted to attempt the peony but I really didn't have time to execute it so I settled with this one instead!
Brushed the flower with some petal dust...

Dotted the edges with some royal icing..
So there you have my simple stencilled birthday cake!
It brings me back in time really...
I poked a candle in! Yes..yes..I'm only a year old :P

Finally a slice of heaven..really the pic doesn't do it justice. That's all then folks.. Till the next cake!!

What to expect from a custom made cake and why are they so 'expensive'?

I have long wanted to write about what most home bakers face in doing their baking and cake decorating business. Thus, I decided to put it all out here for everyone to understand and keep in mind when ordering a custom made cake, online especially. First of all I've often encountered people's (not only clients) shock at when I quote prices of my cakes for them. The most often exclamation is that, "Ooh why is it so expensive for such a small cake?" or I have some clients requesting to bake and decorate at sub-par budgets. Do not get me wrong, I am a considerate person and I understand that people have their own budget and it is good to know your budget when ordering a cake. In fact the first thing I always ask is "What is your budget?" One thing clients must remember is that I am running a business as well. For eg. I can't simply make a fondant cake with 24 pieces of cupcakes for less than Rm 100. It would not even cover the cost.

I also wonder sometimes if the clients understand that my cakes are HOME MADE. They are not the run of the mill Secret Recipe and your local bakery type of cakes which are made exactly the same everytime. Sure those are yummy too but to compare them to home made cakes is like comparing sleeping in a hotel and sleeping in your own warm bed at home. Both might feel good but is essentially different. But you may ask again then, so if the cake is made at home, shouldn't it be cheaper? The answer is a resounding NO. Cakes that are made in bakeries are cakes that have been made with the same design, same recipe EVERYTIME and there is no or limited creative input into the cakes. They are also probably stored in the freezer to maintain their freshness for months and often not freshly made. I've also noticed most store bought cakes are made mostly of cream and less 'cake'.

HOME MADE cakes are baked using tried and tested recipes. Some recipes may have been brought down for generations.They are often baked with the utmost passion and consideration. They are CUSTOM made because they cater to the clients preference in flavour, texture and design. They are expensive for various reasons. First of all,home made cakes only use the best and freshest ingredients. For example a good block of butter may cost Rm 7-9 each, a qualilty tub of fondant runs almost Rm 30 per kg, imported melting chocolate is ard Rm 16 a block.Then flour, sugar etc will add up when making a homemade cake and more if it's multi tiered.What more if you are making specialty cakes like carrot cakes, walnut and fruit cakes. All these are not cheap. We home bakers do not buy in bulk like the commercial bakers do so we cannot afford to lower our prices.

Another contributing factor to the price is the skill that your home baker may have acquired to learn his or her craft.Some baking and cake decorating courses runs for thousands of ringgit/dollars a course, took years and experience to learn. The books that the bakers have invested can be more than Rm 50 and above per book and there are a lot of books and we constantly have to keep updated with the latest trends.You are also paying for the tools, baking equipments like ovens, fridge and heavy duty mixers that a home baker may have invested for their business. Another thing is the amount of electricity used. Imagine running the oven for an hour or more for each cake that we bake every single week.I've had my electricity bills running to almost a thousand ringgit on busy months!

 One more factor and perhaps the most overlooked one is TIME. Baking and decorating often takes time away from my family and what I want to do normally. Some cakes can take hours, days, months to complete especially those involving sugar flowers, figurines and other time consuming decorations. I often do my cakes until the wee hours in the morning just to get it perfect.Time taken also happens when a simple cake consultation is done, be it through emails or face to face. Time is also taken when researching certain designs online and figuring what the clients want exactly.Finally, clean-up. Yes baking and decorating is a real mess. We are dealing with grease from butter,melted chocolate leftovers,flying flour and splatters of batter everywhere once we are done.You will never see a tidy looking baker. You are paying us for the luxury of NOT having to deal with that mess. So you see all these factors contribute to the price of the final product.

Another thing is that most clients probably do not know what exactly goes into baking and decorating a cake.They are often confused by the terms.For eg. they might not necessarily know what fondant is and that there are different types of icings, fillings, cake textures etc.They also choose cakes based on what they have previously tasted in shops and seen on TV that may not necessarily be the same as the homebakers recipe. I'm not saying they are wrong in not knowing, its just that I have to constantly enlighten and educate them on the terms, flavors and what can or cannot be done with certain designs.

I sincerely hope that by reading this post future clients wanting to order from me will understand what we homebakers go through everytime you order a custom made cake from us. My advice is to have an open mind, have some KNOWLEDGE of  what you want (but if you don't we will help you naturally) and in the end you will have a cake that will be beyond your expectation. Thanks for reading!!

I had this great comment  from a customer's point of view from Ms. Carly Shere George on my fb posting of this article :

"   
Great post. at the end of the day, it's really about educating and spreading awareness to the customers and clients on the whys and whats. we had our 3-tiered wedding cake specially made which cost us a leg and an arm... but we fully understand why. It was everything we requested for in terms of design and flavour, and yes quality. mind you, we could have gone bargaining all the way to tomorrow about the exorbitant price but discussing with the cake-maker/ baker and us keeping an open mind makes a whole lotta difference to cater what we need within our budget. Very simply, you can't really compromise on quality and if you do opt for quality stuff, it will cost you, if not substantial at least something reasonable. but not cheap. 


Most consumers/customers think because it's home-made or custom-made, they could exercise their bargaining power to the max (esp when closely acquianted) but at the end of the day, it's business. As a customer, I want my ringgit to stretch as far as it could go when purchasing something. As a business owner, I must educate my customer my products worth and undertand their needs. Awareness and professionalism must be present so middle ground can be met. Being a sweet-tooth, I love my cakes and cookies and pastries. They're the best when the ingrediants are of genuine kind. that's why they're called 'indulgence'. Bottom line, you want quality, you pay have to pay quality. Best of luck to you and your business May. Looking forward to try some of your desserts soon. :)"

The Making : Poodle on a Pillow cake

Hey peeps! I'm back with my latest creation. Yup it's a poodle on a cake! I'm so glad I got this project because it had a nice story behind it. It was a cake from a guy to his girlfriend and the cool thing was they were gonna celebrate it together with the kids at an orphanage. I think that's really sweet, don't you?
Well on to the making!!

The thing was, I needed a board to fit an 18 by 15 inch cake.There was none that I could find at the bakery supplies store so I had to make one from scratch. I basically bought a wooden art board, some foam boards and some corrugated plastic sheets and stuck them all together with tape .Wiped it clean and voila!! A 23 by 26 inch home made cake board.

 The poodle.Well I had to look up the internet for a picture of a nice poodle figurine and made it based on that.Client wanted a brown poodle to match his own. I really had to make this like five days before as the fondant mixed with gumpaste needed time to set. I had to wait for the pic of the actual dog to get the fur colour right but I also had to keep in mind the whole colour combination of the cake itself so I made some adjustments. Basically I did the torso first, then the legs to steady the torso and finally the head. More on that later....

 Next up I had to prepare the board. First I had to cover the sides of the surface of the board with white fondant. Then I rolled out Satin Ice dark chocolate fondant and started streaking random cuts from up to down with my roller cutter. I must say a few small stripes got into my mouth while doing it because the fondant was so chocolatey and yummy!
 Then I started arranging the strips on to the board. The trick here is to create a zebra looking pattern.It doesn't have to be perfect but you do need to put a little thought on how to fill in the spaces nicely.
 So this is how it looks like once done. I left the space in the middle empty because that will give me an estimate on where the actual cake should be placed. 
 Ok back to the poodle. After a few days and a pic of the actual poodle later, I began to make the 'fur' of the poodle. Now the fur is actually made up of royal icing. First I made a white base and piped it on to the dog in swirling motions.Then waited for it to dry a few hours so that it will harden. After that I made a cream and brown based RI and added it on top of the white fur. I didn't want to make it too realistic as I wanted to add some whimsy to the dog itself..looking all pretty and shall I say 'poodle-ey'..:). I forgot to ask if the poodle was female or male but I added the bow anyway to match the cake.
 This is how it looked like once fully piped.
 Added the eyes and nose to finish it off and there you have a brown poodle!
 On to the cake! I baked a chocolate fudge cake with a recipe that would be stable enough for carving as I had to shape it into a pillow. This took a good one hour to get the dimensions just right and symmetrical. I could have used a pillow pan but the size the client wanted was much bigger than the pan. So carving it is!
 Next I covered it with pink fondant. This was challenging because I've never draped a cake that wide before and you really need to make sure you have enough fondant to begin with when you start rolling. This is where you could say I worked out a bit. Ladies, if you are trying to get rid of your flabby arms, this is the exercise for you! But once you see that cake nicely covered, you will know that it was all worth it!

 Next I rolled on the stitched pattern unto the fondant using the uh.. rolly-stitchy-thingy..I have no idea what you call it. The pillow itself wasn't perfectly flat but aren't pillows supposed to look 'plushy'?..if that's even a word to begin with :D. I also tucked the pillow nicely with some string of fondant beads.

 Next, my favourite part. I always feel artist-ty when I pull out my airbrush gun (and slightly dangerous too!--gets me excited -haha!) Anyway, I airbrushed on some pearl shimmer to give the pillow that plush shine to it.
 Finished airbrushing the pillow. A little crack because I waited too long after draping to spray on the airbrush so it dried up a bit but still yummy looking nonetheless.
While waiting for the airbrushed cake to dry, I made the name plaque for the lucky birthday girl using an edible ink pen. What a sweet name, don'cha think?
 Then I made the birthday message.

 I don't have the pics here but I also made a bow days in advance. I stuck it on the cake along with the name plaque and then added a black rug for the pretty poodle to sit on.


So there you have it a POODLE ON A PILLOW cake. What a journey making this cake and I hope the girlfriend and all those at the kids home loved it. Till the next challenge..adios!