Weddings! Who doesn't love weddings? Recently, I was privileged to bake and decorate a 3 tier wedding cake for a customer. She wanted a theme of romantic cascading roses with pink centres to match her pink and blue wedding colours. I also suggested handmade wedding couple figurines to add a modern and personal feel to the cake. Below are some pictures of the completed cake at the venue.
The wedding couple following the actual wedding dress.
The gum paste roses
Fondant lace borders
A romantic combination at the venue
Okay so let's start with the making of the gum paste roses. Thirty bases had to be made a week before for it to harden in preparation for the petals.
Then cut out of rose petals was ruffled and stuck on to the base.
This is how the rose looked like once arranged.
I then glued on the calyx
Side view of the pretty rose made entirely with gum paste.
A lot of work as I only had time to make 5 roses a day due to other things I need to do so it took approximately 6 days to finish creating the 30 roses.
Then I brushed the centres with edible pink dust.
Now on to the figurines. I shaped the head and painted on the face and the made the hair using a clay extruder.You may order the clay extruder here in our Pre-order online shop.
Then I shaped the body and poked a spaghetti stick through it. I then let it dry.
Next up is the groom's head. It really does help to have the proper tools to create this. You may purchase them at your nearest baking supplies store or you can order it here too.
Here I modelled the groom's torso, legs and shoes.
I painted on the eyes using a black edible marker pen and shaped the ears using a tool.
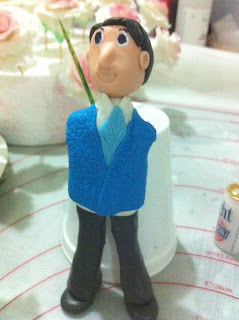
Next up I made the vest and embossed a pattern using a patchwork embosser.You may order a selection of patchwork cutters here as well.
Then I fixed a tie...
..and coat and the groom was looking dapper in his wedding suit. :)
I then made sure the height of the figurines complimented each other and let it set.
After the figurines were set and relatively steady, I became a fashion designer instead and started draping the bride with a fondant gown.
I followed the actual wedding dress with ruffles on the chest and folds on the skirt itself. A great way to personalize and remember how the bride looked on her most important day :)
Then I brushed on edible lustre dust to bring out the shine and shimmer to the dress. Edible dust may also be pre-ordered here.
This is how it looked like once done ..minus the arms of course...:)
And just like make-up, a bit of blush for the bride.
I then made a tiny fondant rose bouquet.
Bride and groom standing side by side together with loving arms over her waist.How cute is that!
Side view..I'm loving the train. The fondant figurines took a lot of concentration and attention to details but it was worth seeing the final product in the end.
Next up, the actual cakes! The couple wanted a carrot cake base with cream cheese fillings and yam flavour cake.

The carrot and yam cake fully frosted.
Once covering the cake in fondant, I made lace borders using the lace border molds which you can pre-order here too.
The top tier was a dummy because she wanted 3 tiers but not so many invited guests so settled on two tiers of actual cake.
The second tier was marked with a diamond embosser and the traced with a fondant roller marker.Once again you can purchase these here.
For stacking, dowel rods were used and marked using an edible ink pen.
Rods were poked into the cake.
Finally the whole cake was airbrushed using an airbrush machine and some pearl shimmer.
The result? An elegant romantic 3 tier wedding cake for a memorable occasion. As you can see a lot goes into creating a wedding cake even with a simple design. I hope that when I quote a price, the customers will appreciate how it reflects the hours and effort put in creating such a cake. If you would like to have your wedding cake custom made to your desire for your wedding day, please don't hesitate to write to me at homemaydecakes@gmail.com.. Thank you all for reading! :))


No comments:
Post a Comment